为什么我们在react项目中, 用到redux的时候,常常会选择react-redux。react-redux到底为我们做了什么便利的事情呢???
不用react-redux时的手动连接
假设有一个组件
首先我们提前做好把redux的基础准备工作做好。
接下来, 我们该怎么办呢?
我们需要解决的问题是什么?
- 告诉组件我现在的状态(store.getState)是这个样子的, 你该更新就更新吧。
- 子组件因为一些用户操作,导致了状态应该有所变化,通知store更新state。
redux的第一件事,告诉组件我现在的state值。
将state传给最大的父组件, 由父组件一层一层往里传。如下:
但是采用这种方式的时候, 跟在最外层父组件上用内部state实现,其实也没什么区别。我们不就是觉得应用复杂了, 层层层传觉得麻烦才考虑用Redux的吗?这样我们为什么还要用Redux呢???对,我们不能走老路。
这时候脑子里出现了第二种方法,利用context。偷偷借鉴下Provider的实现原理, 咱们来实现一下。
在最外层的组件中, 将store定义为子组件的context,这样所有的子组件都可以获取到。
子组件怎么获取store呢?
在子组件中,去获取context中的store,放到自身组件的state中,并监听store的变化,实现state的实时更新。
但是, 这样重复的步骤我们要在每一个需要用到状态的子组件中都来一遍????这也太麻烦了吧,感觉也不是那么爽。
第二件事, 子组件因为一些用户操作,导致了状态应该有所变化,通知store更新state
将actions通过子组件的容器组件一层层往下传。
同样的, 我们需要在所有子组件上重复进行这两项操作。
以上就是手动链接的一些简单幻想,总结一下就是:
- 麻烦。
手工当然要比自动化织布机麻烦地多。react-redux为我们做了dispatch , subscribe, getState三大重要的步骤。手动连接: component => dispatch(action) => reducer => store.subscribe => store.getState => component
react-redux: component => ActionCreators => reducer => component - 没有优化性能
手动连接,任何state的变化都会导致整个组件的重新渲染。
所以我们建议用react-redux去做react和redux的桥梁。
react-redux怎么用
react-redux怎么实现的
Provider
Provider的实现其实并不用多说, 就是利用context。在使用的时候, 用Provider包裹在最外面。子组件去获取context中的数据, 具体怎么获取呢?那我们就要仔细看看connenct做了什么了。
connect
connect实现也是一步步柯里化的进程。从我们对connect的调用我们也可以看出来,connect(mapStateToProps, mapActionsToProps)(MyComponent)。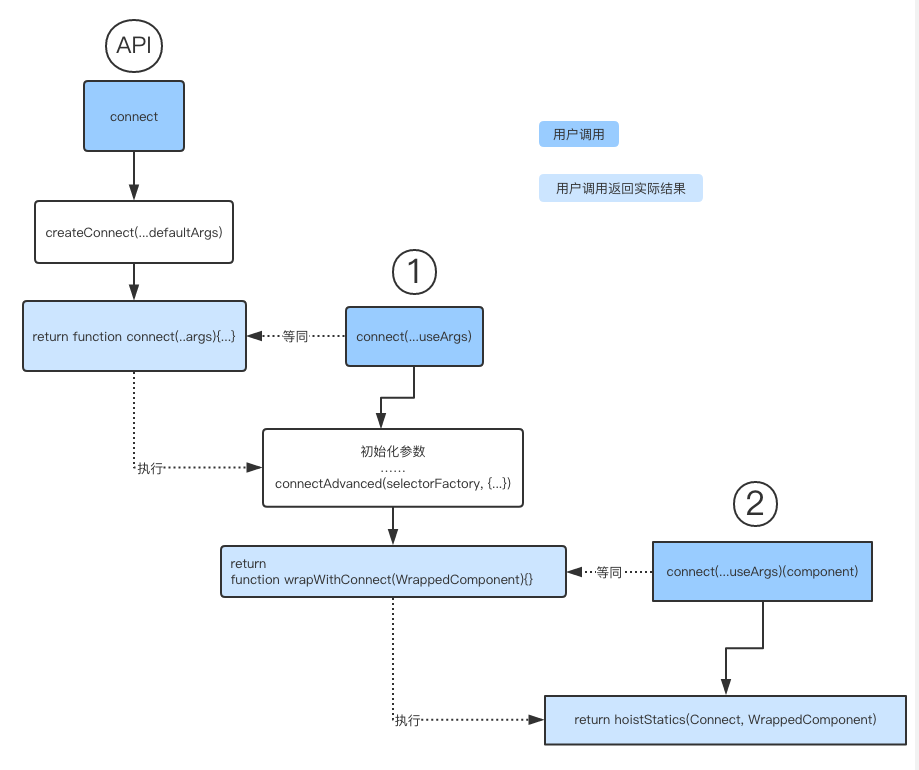
我们实际的最终调用其实就是对应图中2步骤,返回了hoistStatics(Connect, WrappedComponent);
hoistStatics是什么?简单来说, 就是将WrappedComponent的非React属性拷贝到Connect上。具体可以参考hoist-non-react-statics。
那么Connect又是什么呢??这才是我们的重点。
Connect是一个React组件。
在构造函数里面,进行了两项初始化, initSelector 和 initSubscription。
initSelector里面三行代码:
那么接下来, 我们来搞懂关于Seletor的两件事~
第一件事:makeSelectorStateful到底做了什么妖?
第二件事:selectorFactory造出的sourceSelector是什么呢?
我用这幅图来简单概括一下: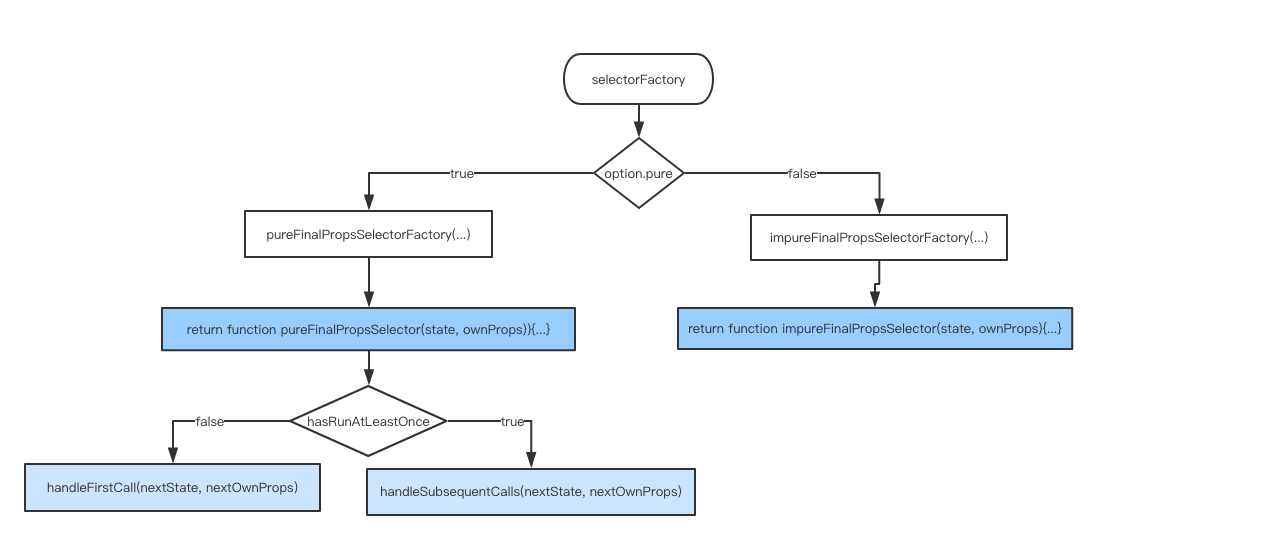
那么我们先来说说, seletor.run()是怎么获取合并的props的呢?
selectorFactory有两种情况,主要是看connect api中传入的配置options对象中pure属性,默认true。
true的时候执行pureFinalPropsSelectorFactory,返回函数pureFinalPropsSelector;
false执行impureFinalPropsSelectorFactory, 返回函数impureFinalPropsSelector。
不管执行哪一步,都是暂时返回一个函数finalPropsSeletor。
这个被返回的finalPropsSeletor最终呢就是在makeSelectorStateful中的run方法中执行的:const nextProps = sourceSelector(store.getState(), props)还记得不?
那么我们再来看看这个finalPropsSeletor是怎么合并的props。
pureFinalPropsSelector(nextState, nextOwnProps)
这里还要做一个判断, 是否是第一次执行(hasRunAtLeastOnce===false),我刚来, 第一次走这个流程,ok,那就简单记录下就可以了。1234567891011function handleFirstCall(firstState, firstOwnProps) {state = firstState //记录初始stateownProps = firstOwnProps //记录C初始propsstateProps = mapStateToProps(state, ownProps) //获取statePropsdispatchProps = mapDispatchToProps(dispatch, ownProps) //获取dispatchPropsmergedProps = mergeProps(stateProps, dispatchProps, ownProps) //合并propshasRunAtLeastOnce = true //标识一下, 我来过了, 不是新人了return mergedProps //返回合并的props}注: mapStateToProps mapDispatchToProps mergeProps可以简单理解为 使用connnect api中传入的配参以后不是新人了, 该怎么走呢?
123456789101112function handleSubsequentCalls(nextState, nextOwnProps) {const propsChanged = !areOwnPropsEqual(nextOwnProps, ownProps)const stateChanged = !areStatesEqual(nextState, state)state = nextStateownProps = nextOwnPropsif (propsChanged && stateChanged) return handleNewPropsAndNewState()if (propsChanged) return handleNewProps()if (stateChanged) return handleNewState()return mergedProps}注:areOwnPropsEqual areStatesEqual 即connect api暴露出来的option方法中的属性值很明显, 去判断传入的props 和 当前store中的state是否变化, 去分别执行不同的合并函数。
当props和state都发生了变化的时候:123456789function handleNewPropsAndNewState() {stateProps = mapStateToProps(state, ownProps) //缓存新的stateProps值if (mapDispatchToProps.dependsOnOwnProps) //dependsOnOwnProps主要是判断mapDispatchToProps是否依赖ownProps的值dispatchProps = mapDispatchToProps(dispatch, ownProps) //若是, 则更新dispatchPropsmergedProps = mergeProps(stateProps, dispatchProps, ownProps)//合并最新的props并返回return mergedProps}仅当props发生变化时:
1234567891011function handleNewProps() {//分别取判断mapStateToProps和mapDispatchToProps是否和ownProps有关if (mapStateToProps.dependsOnOwnProps)stateProps = mapStateToProps(state, ownProps)if (mapDispatchToProps.dependsOnOwnProps)dispatchProps = mapDispatchToProps(dispatch, ownProps)mergedProps = mergeProps(stateProps, dispatchProps, ownProps)return mergedProps}仅当state发生变化时:
12345678910function handleNewState() {const nextStateProps = mapStateToProps(state, ownProps)//缓存新的statePropsconst statePropsChanged = !areStatePropsEqual(nextStateProps, stateProps)//判断stateProps与原来相比是否发生变化stateProps = nextStatePropsif (statePropsChanged)//仅当stateProps发生变化的时候,才更新mergePropsmergedProps = mergeProps(stateProps, dispatchProps, ownProps)return mergedProps}当pure设置为true的时候, 我们可以根据options中设定的相等判断条件(areStatePropsEqual、 areOwnPropsEqual、areStatesEqual)去判断对应的变量是否发生变化, 从而决定是否更新props。这就是其中的性能优化的重要点。
impureFinalPropsSelector(nextState, nextOwnProps)
理解了pureFinalPropsSelector之后, impureFinalPropsSelector很好理解, 不做任何比较,直接返回了mergeProps。1234567function impureFinalPropsSelector(state, ownProps) {return mergeProps(mapStateToProps(state, ownProps),mapDispatchToProps(dispatch, ownProps),ownProps)}
讲了一大通, 终于把Selector的两件事讲完了。那么这个selector暴露出的两个参数供我们Connect来使用:
1、selector.shouldComponentUpdate 是否应该更新组件了
2、selector.run() 获取nextProps
搞明白了Selector之后, 我们再来看看initSubscription函数里做了什么。
讲别的之前呢,Subscription先了解一下?
Subscription类源码链接
同时呢,这里有一篇比较好的博客庖丁解牛React-Redux(一): connectAdvanced里面讲述了Subscription的具体作用。
onStateChange里面干了什么呢?
onStateChange是store发生变化的回调函数。
Connect类构造函数里面做的事情我们大概有了了解, 本身Connect就是一个React组件, 那么我们再来看看这个组件本身的生命周期函数。
所有的生命周期函数还是利用了this.selector.run去执行获取新的props, this.selector.shouldComponentUpdate去决定该不该更新。
乱七八糟地讲述完了自己看源码的整个经历。可能比较晦涩, 希望自己能反复看看自己的文章, 多看多改,加强博客的撰写能力。
全文基于react-redux 5.0.6